Using Windows 10 Volume Slider to Change Your Playback Device
With the number of audio producing devices that can be connected to a computer. Multiple monitors (which have built in speakers), headphones (wired & Bluetooth) speakers (wired & Bluetooth), as well as remote WiFi devices, it can sometimes appear the computer is not producing any sound.
The volume slider of Windows 10 lets you not only adjust your PC’s volume, it enables you to choose the audio device / speakers you wish to use.
Go to your volume control in the system tray of your windows computer
Click on the volume control icon
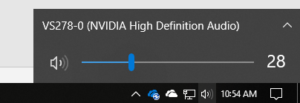
The volume control window will be displayed
Above the volume slider you will see the current playback device
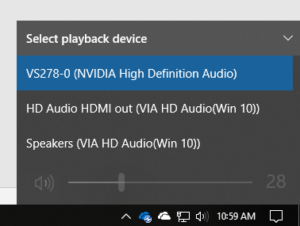
Click on the chevron next to the current playback device to display any other available devices on your computer
You can now select your desired playback device: monitor, headphones or speakers
The volume slider will now control the volume level for that particular device.
SPECIAL NOTE: Some devices will have their own volume controls (Monitors, Speakers, EarBuds) either external or remote control..
You may have to adjust the volume on those devices to an appropriate level before hearing what your computer is producing.
Trouble Shooting Tips:
- Check your selected device is not muted
- Check your desired audio device has power (don’t forget batteries)
- Check you desired device is on.
- Check the audio cable is fully inserted to the appropriate output jack.
- If your audio device has external volume controls, ensure volume is at an appropriate level.
- If you are selecting a monitor, ensure the monitor has speakers and the volume is turned up on the monitor.
- Check that your Bluetooth device is within range to receive the audio signal.


